Uno dei primi progetti da fare ad uncinetto da principianti è sicuramente la lavorazione a rete!
Basta saper fare catenella, mezza maglia bassa e doppia maglia alta e si va avanti veloci, anche la sera davanti alla tv.
Io sto facendo una borsa estiva in questi giorni (che non so ancora se terrò per me o metterò in vendita) e ho pensato di condividere il tutorial qui, ma di pattern e schemi ne trovate tantissimi! Una volta imparato a fare la rete non potrete più farne a meno, è veloce e consuma poco filo, quindi usatene uno di qualità!

 Cosa ti serve:
cotone (per la quantità dipende dalla grandezza della borsa)
uncinetto adatto al filo
un bel caffè (attenzione, questo accessorio è importantissimo, se non l’avete la borsa verrà malissimo ^^).
Io sto usando uncinetto 4 Clover Amour e il 100% cotone peruviano Pima Cotton di BettaKnit!
Procedimento:
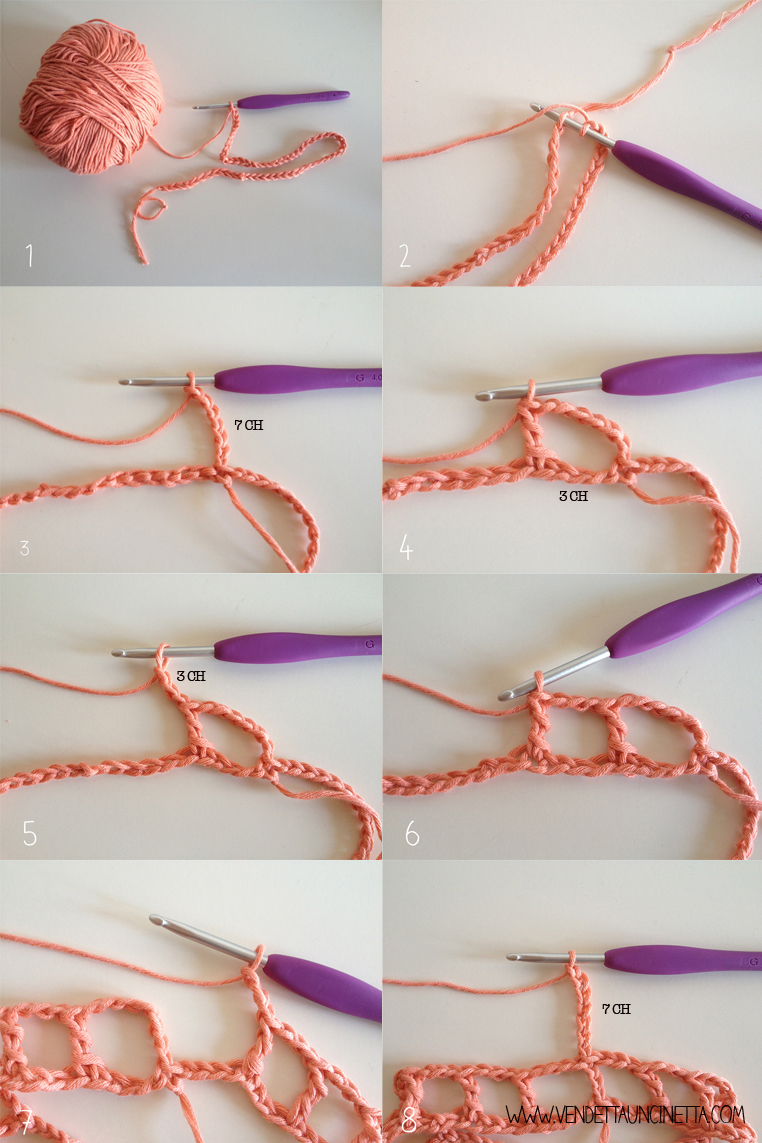
1 – Partire da un numero di catenelle che sia multiplo di 3, consiglio ad esempio 90 o 120 (nel tutorial fotografico che vedete ne ho fatte solo 30 per essere più chiaro in foto, ma voi potete farne quante volete!).
2 – Chiudete ad anello con una mezza maglia bassa nella prima catenella, sarà la base della borsa.
3- Fai 7 catenelle volanti (Volaaareee Oooh Ohhh)
4 – Salta 3 maglie nella catenella di base e nella 4° lavora una doppia maglia alta.
5 – Fai 3 catenelle volanti.
6 – Salta 3 maglie nella catenella di base e nella 4° lavora una doppia maglia alta.
7 – Continua così per tutto il giro ripetendo gli step 5 e 6. Quando arrivi in fondo, chiudi le 3 catenelle volanti nella 4° catenella delle 7 che avevi lavorato all’inizio, con una mezza maglia bassa.
8 – Ricomincia il giro facendo le 7 catenelle volanti dello step 3 e continua come il giro precedente.
Facile, no?
Ora continua per tanti giri quanto vuoi che sia “alta” la tua borsa!
Per la seconda parte del tutorial, leggi qui!
^^^^^^^^^^^^^^^^^^^^^^^^^^^^^^^^^^^^^^^^^^^^^
ENG:
One of the first projects that can be easily done by crochet beginners is definitely the crochet net!
You just have to be able to do the simple chain, slip stitch and treble crochet (US Chart) and you will work fast, crocheting in front of the tv too!
I’m working on a summer crochet net bag right now (I don’t know yet if I’ll keep to myself or I’ll put it on sale) and I thought to share the tutorial here, but you can easily find many similar patterns and schemes on the web! Once you learn to make the crochet net you will love to use it, it’s fast and very little yarn is needed, so be sure to use a quality one!
What do you need:
cotton (the amount depends on the size of the bag)
crochet hook (appropriate for the thread size)
a cup of coffee (pay attention, this last accessory is very important, if you don’t have it, the bag will turn out badly ^^).
I am currently using size 4 Clover Amour hook and 100% Peruvian cotton “Pima Cotton”/a>by BettaKnit!<
Procedure:
1 – Start working a number of chains that is a multiple of 3, for example: 90 or 120 (in the photo tutorial I made I only did 30 to be clearer).
2 – Close in a ring with a slip stitch in the first ch.
3- Make 7 chains.
4 – Skip 3 ch in the original chain and work a treble crochet in the 4th ch of the original chain.
5 – Work 3 ch.
6 – Skip 3 ch in the original chain and work a treble crochet in the 4th ch of the original chain.
7 – Keep going all the way round by repeating steps 5 and 6. When you end the round, close the 3 ch with a slip stitch in 4th ch of the 7ch you worked at the beginning.
8 – Start again by working 7ch and repeating from step 3 .
Easy, right?
Now follow for many rounds until your bag’s height is good for you!
For tutorial’s second part, see here!


